


Procedural Generation - The Dungeons
June, 2013
Way back in 2011 I wrote a blog post on procedurally generating caves based on an algorithm I half made up, and people seemed to really enjoy reading about it. So, I'm going to explain some more procedural generation adventures I've had as I try to make a little action roguelike game.
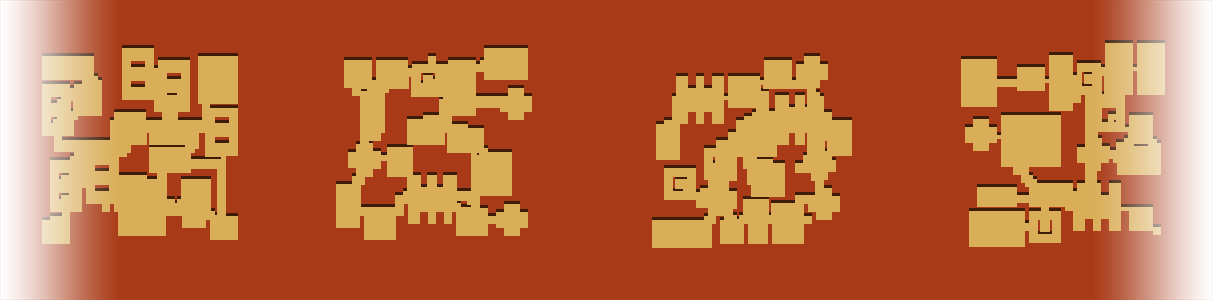
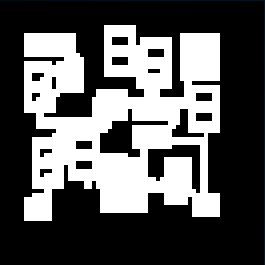
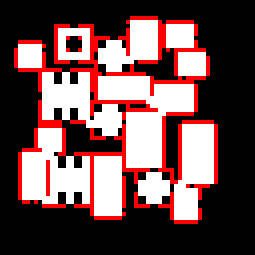
Before I start explaining, here's a few images of what you can expect from this generation:
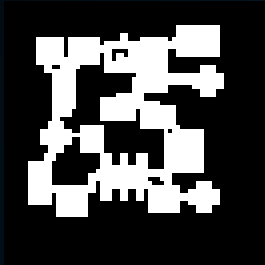
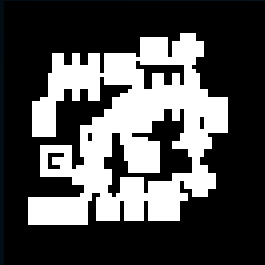
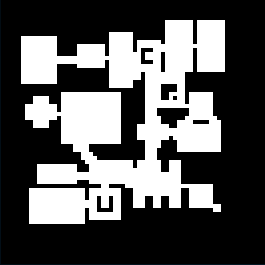
THE RUNDOWN
The goal of this generation (as seen above) is to create a bunch of interconnecting rooms that the player can traverse. All the rooms are either a pre-designed level, or simply a rectangle of a random size. The placing of the rooms is completely random, and the tunnels are then dug between each room in a circular fasion, trying to stay on already-existing paths.Step 1: The Map
The very first thing to do is create your map, and fill it up with Wall tiles. In my case, there are 3 types of tiles: Floor, Wall, Stone. Each of these will be explained later, but basically each one should be an integer value of some cost (I had Floor = 1, Wall = 4, Stone = 20). My Map is then a 2D integer array of these.
Step 2: Place Random Rooms
Okay, next we choose some number of rooms to place. This generally depends on the size of your map, and the min / max size of the rooms you can place. Once you've decided how many rooms to place, and how big and small they can be, you can begin placing rooms. Attempting to place a room essentially means you're checking to make sure the random area you selected does not contain any floor tiles already. To do that, you simply check the area that you're going to be placing the room (a rectangle) in your 2D map array and make sure it doesn't contain any floor tiles (in this case, positions in your array containing a 1). I also had template rooms, that were pre-designed rooms. Whenever attempting to place a room, the generator would decide to either place a normal rectangle room or a predesigned room.
Note that each rectangular area of the room is stored in an array of rectangles, for later use (just so we know where the rooms are).
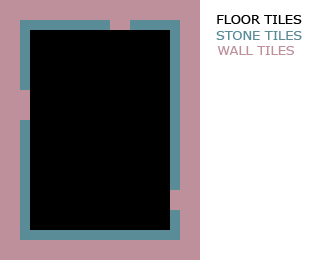
Once you've found a clean area of Walls to place your room, you dig it out with floor tiles. Now, here's where things get a bit interesting. I decided to place a border of Stone Tiles around the room once it's placed. If you noticed before, Stone has a higher integer value than both Floors and Walls. The reason I do this is because I want to make it so when tunnels dig themselves they avoid going directly through a room as much as possible, to keep the general shape of the room. However, I do leave a few gaps in the stone to act as “doors”, or easy places for the tunnels to go through. Here's what a general room looks like:
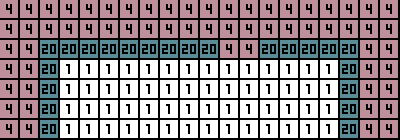
Here's what it looks like in our map's 2D array:
Okay, cool! Now, after all the rooms are placed, we should have something like this (note: some rooms look a bit odd because I have some template rooms that get randomly placed, too)
Step 3: Tunnels
So, we have a bunch of rooms sitting around and things are feeling pretty good, right? Well, let's toss some tunnels in there. There's a bunch of ways to do this. You could make little miners that move from one room to the next, and just avoid Stone tiles as much as possible, or something. But, in my case, I decided to use A* pathfinding, using the costs I described above. I'm not going to get into the details of A*, so here's a really great explanation that I used to learn it.
Specifically, tunnels are dug from the center of one room, to the center of the next. Once a path has been found, the given tiles in the path are turned into floor. Note, that the tunnel is dug out from the map BEFORE we do the next pathfind. This way, other tunnels will often follow the path of already existing tunnels, instead of doing their own thing.
Also note, that in my actual code, once a path is found, I will choose a random SIZE for the tunnel. The size in this case is only 1 or 2 tiles, but basically it digs out the tunnel larger than the actual original path (adding some random variance and makes things look more organic).
The order the tunnels are dug just starts from the first room in the rooms array (referenced in the note in step 2) to the next room in the array, and so on, until every room is connected.
Step 4: Placing stuff
Okay, so now there's a bunch of rooms and tunnels connecting all of them. For placing stuff, we have a lot of options. You could just randomly place stuff all over the place (searching for tiles that aren't walls or stones). But what I tend to do is loop through every room in our rooms array, and place a set amount of enemies in each one. You'll still want to probably make sure whatever position you select in a room is actually a floor (in case you create template rooms). Things like treasure could pick a random room and then a random position in it.
I haven't decided how to pick the start / end position yet, but I think the best thing to do would be to select the first room in the rooms array and place the player there, and then find the room furthest from that one and place the end around there.
THE CODE
This is going to be a bit messy, and I'm not sure how useful you'll find this, but here's the C# code I used to generate the maps in my games. There's some parts that are pretty gross (my A* pathfinding code is kind of ugly and could really use a clean rewrite). But it gives you a basic idea of what's going on.Along with that, here's an example template room.
The template room was created using Ogmo Editor